TS-0565-190X Modular Straight GateUpdated 25 days ago
| TS-0565-1901 | MSG50 Modular StraightGate50 Compatible with Honda |
| TS-0565-1902 | MSG50 Modular StraightGate50 Compatible with BMW |
| TS-0565-1903 | MSG50 Modular StraightGate50 Compatible with VAG |
Important Notes on Your Modular Straight Gate
Turbosmart accepts no responsibility whatsoever for incorrect installation of this product which is potentially hazardous and can cause serious engine damage or personal injury.
Consult your local specialist before setting your desired boost pressure, setting boost beyond your engines capability may result in engine damage.
The Modular Straight gate is designed for use with a turbocharger that does have an internal wastegated that is electronically controlled.
Consult your local specialist before setting your desired boost pressure, setting boost beyond your engines capability may result in engine damage.
Correctly setting up a sensible boost control strategy to ensure engine safety is highly recommended.
Recommendations
- Allow for adequate cool airflow around actuator
- DO NOT Mount the wastegate so that the top motor housing is less than 100mm from a heat source
- Turbosmart recommends that your wastegate is fitted by an appropriately qualified technician.
- Turbosmart recommends that the engines Air/Fuel ratio is checked while setting the desired boost pressure, as any increase in boost pressure can cause the engine to run “LEAN”, resulting in possible engine damage.
- Turbosmart recommends that boost pressure is set using a dynamometer and not on public roads.
- Turbosmart recommends that a boost gauge be permanently fitted to the vehicle.
Please check that the following items have been provided in your Modular Straight Gate packaging.
Part | Description | Use |
1 | Modular Straight Gate | Main Unit |
2 | Fitting Kit | Required fasteners to mount modular straight gate |
3 | Turbosmart Sticker |

Tools Required
- Basic Mechanics tools
- Allen Key Metric Set

FITTING YOUR ACTUATORLESS WASTEGATE
Mounting your New Turbosmart Modular Straightgate
Slide the actuator head through the turbocharger mounting bracket. Once mounted on the bracket, secure bolts to hold actuator in place. These are located in the box. It's recommended to leave nut on the shaft to hold the position roughly of the home position which will be matched up later.
CAUTION! Ensure all nuts are bolt are tightened up after final fit up.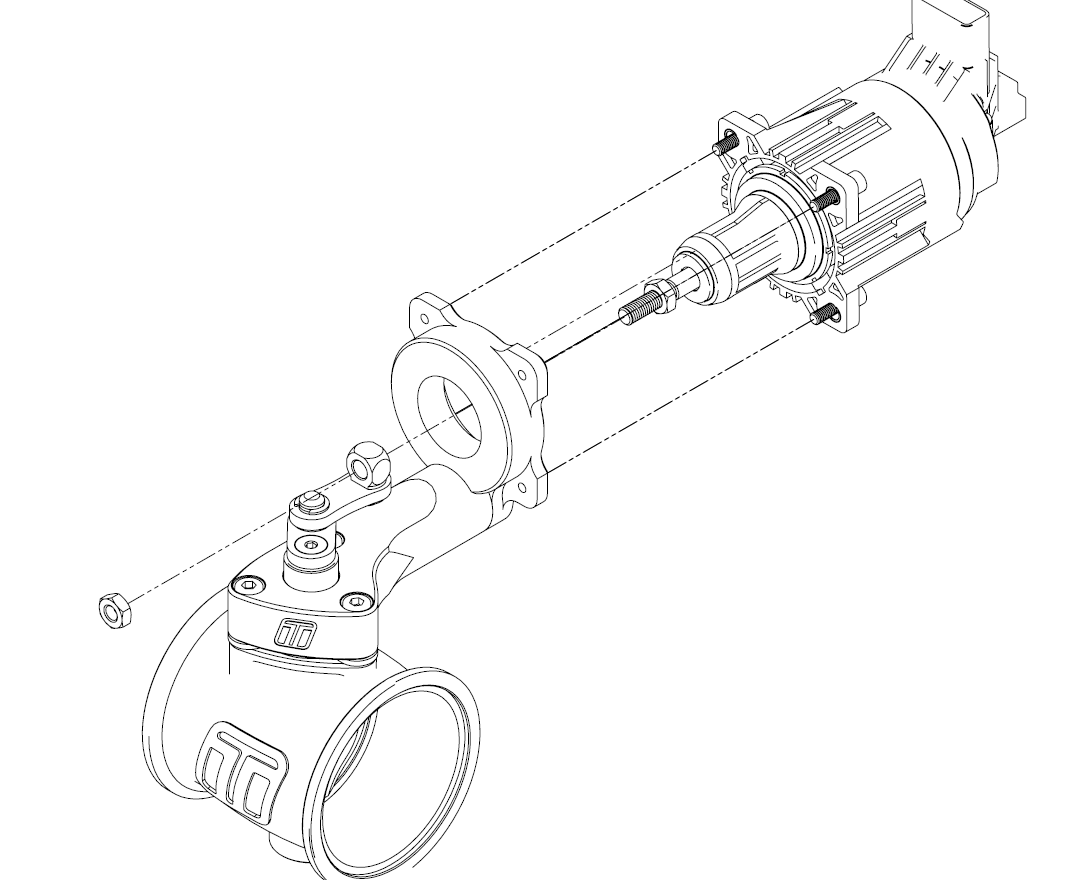

Install Actuator through bracket
.png)
Actuator secured onto bracket
Applying Actuator Preload / Ensuring Wastegate Flap is Closed
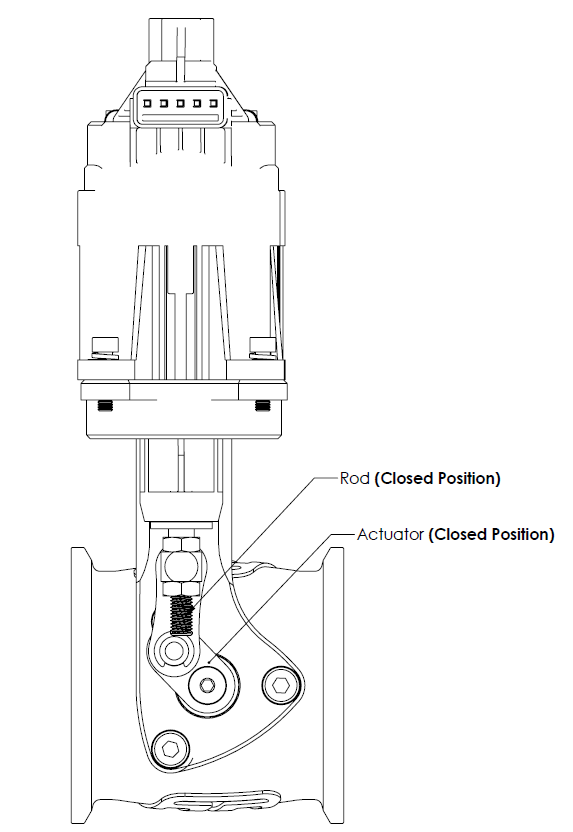
In order to ensure the actuator does not suffer any stiction/temperature creep issues or the wastegate flap does not stay slightly open, it is important to apply a small amount (1mm/0.039”) of preload to the wastegate actuator. Understanding of the OEM specifications on calibrating and setup required to mount the actuator. In the case below the rod is completely in the home position. The straight gate too is in the close position. Allowing these too be matched allows for clabritation to be intialised. Following the manufacture's guidelines is important.
Closed position

Open position
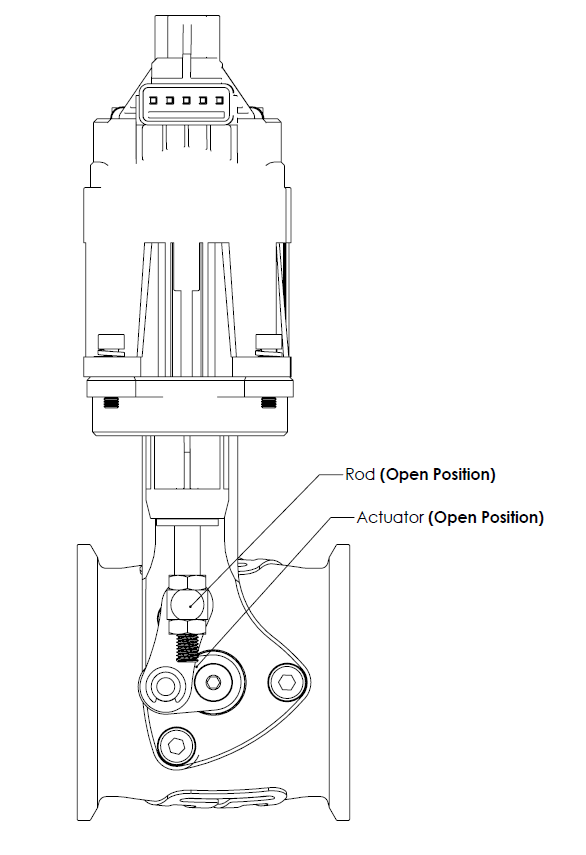
To apply 1mm/0.039” preload, simply turn the adjuster nut 1 full turn in the clockwise direction.
To lock the actuator in this position, turn the locking nut by hand until finger tight, then proceed to tighten nut firmly to secure actuator in place. (6.5Nm / 4.8 ft lb)
Start Engine and Check for Leaks
Congratulations, your Modular Straight gate is installed and ready for use. Double check all fittings, lines and mountings then proceed to start engine and check for leaks.
FITTING YOUR MODULAR WASTEGATE
Mounting your new Turbosmart Modular Straight Wastegate
The weld flanges should be welded to your exhaust system. The weld flanges are compatible with Stainless Steel and Mild steel welding rod material.
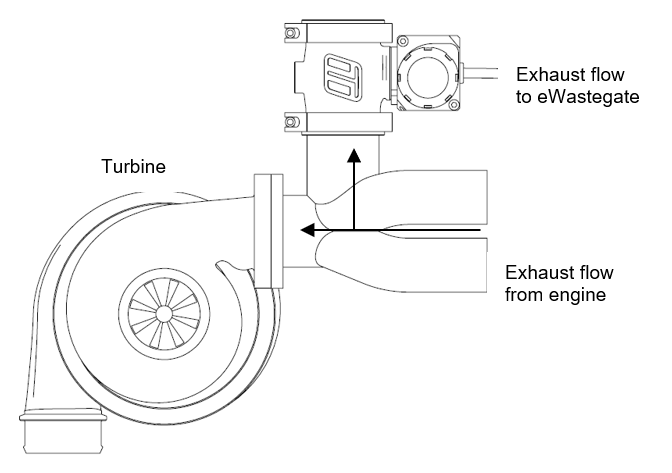
For best results, an attempt should be made, if space allows, to mount the Straight Gate at an angle to the exhaust flow to allow for better flow than a 90-degree mounting. See the schematic diagrams below for examples of mounting positions.
.png)
(Best Flow) Symmetric mounting allows an excellent flow of exhaust to the Straight Gate

 Caution Do not place the modular straight gate near a significant heat source as this could shorten the life of the internal electronics
Fitting the Modular StraightGate
Prior to mounting the Straight Gate, place v-band over weld on flange by unscrewing the nut on the v-band as far out as possible and then squeezing the bolt in a syringe motion to expand the v-band (squeeze the dots together below). Once the v-band is in its fully expanded position, slide the v-band over the flange to allow for the wastegate to be installed.

Clocking Modular Straight Gate
The crank arm should remain in the same orientation as pictured below.
.png)
TROUBLESHOOTING
- Wastegate not actuating - Confirm electrical connector is plugged in.
- Poor wastegate actuation – Confirm no obstructions in actuator rod path.
- Boost creeping at high rpm - Wastegate flow path is poor, wastegate is too small for the application, ensure ball joint is not seized
- Failing the above, submit a technical request form with information about your engine, oil type and photos of the installation and our expert technicians will respond as soon as possible.